Tuesday, March 6, 2012

Torta di patate e zucchine

Sia le patate che le zucchine sono degli ortaggi che apprezzo molto in cucina per la loro versatilità, ottimi nei primi piatti ma anche nella realizzazione di frittate, antipasti e contorni. Oggi ve li propongo in questo gustoso tortino, un ottimo contorno ma anche piatto unico, di facile preparazione e, con pochi e semplici ingredienti mette d’accordo tutti.

Ingredienti:
1kg di patate 
700 g di zucchine (romanesche o chiare)
200 g di ricotta
60 g di pecorino
1 cipolla
2 uova
pangrattato q.b.
sale 
pepe

Lavate e grattugiate con la grattugia a fori larghi le zucchine e gli scalogni, fateli stufare in una padella con l’olio, aggiungete il sale e continuate a cuocere senza farle colorire. Lessate le patate, pelatele e passatele nello schiacciapatate, mescolatele alla ricotta, unite le uova, il pecorino grattugiato, regolate di sale e di una generosa macinata di pepe. Unite le zucchine cotte al composto di patate e mescolate in modo omogeneo. Ungete una pirofila (io ne ho usata una rettangolare ma va bene anche circolare), spolveratela con un velo di pangrattato e versate il composto livellandolo, decorate con i rebbi di una forchetta, spolverate ancora un velo di pangrattato, distribuite sopra un filino di olio e infornate per 30 minuti a 200°C.

Nota:
Volendo si può arricchire aggiungendo della mozzarella o fontina tagliata a cubetti.

Monday, March 5, 2012

Peanut Butter rice krispie treats

I saw the post in the morning, went to the store and had them ready in time for dessert. Truth be told though, few things stop my heart the way peanut butter and chocolate do. Then throw in Rice Krispies treats and you’ve completely disarmed any semblance of self-control I may have otherwise possessed. I didn’t eat a ton of Rice Krispies treats growing up, but they have somehow transfixed me as an adult. I’m such a sucker for them, and I love making all sorts of variations. This one in particular will be making many appearances in the future!


Ingredients:
230 gr. marshmallows
100 gr. rice krispie cereals
1 tablespoon heavy cream
1 cup crunchy peanut butter
2 tablespoons white chocolate chips
150 gr. dark chocolate


Measure the cereal into a large mixing bowl and set aside. Melt the marshmallows and cream together in a medium saucepan over medium heat (or in the microwave for about 3 minutes, but keep watch so the marshmallows don’t puff over the sides of the bowl!). Pour the melted marshmallow mixture over the cereal and mix well so the cereal is coated. Pour into the prepared pan and use a buttered piece of wax  paper to press evenly into pan.

In a saucepan, melt the peanut butter until thin, about 1 minute. Gently stir in the quartered peanut butter cups and then pour over the treats. Using the back of a spoon, gently spread the peanut butter mixture evenly across the top. Sprinkle with white chocolate chips.
Again in the saucepan, melt the chocolate chips. Using a spoon, drizzle the melted chocolate across the top. Place the pan in the refrigerator to set before cutting and serving. Store in an airtight container =)

Friday, March 2, 2012

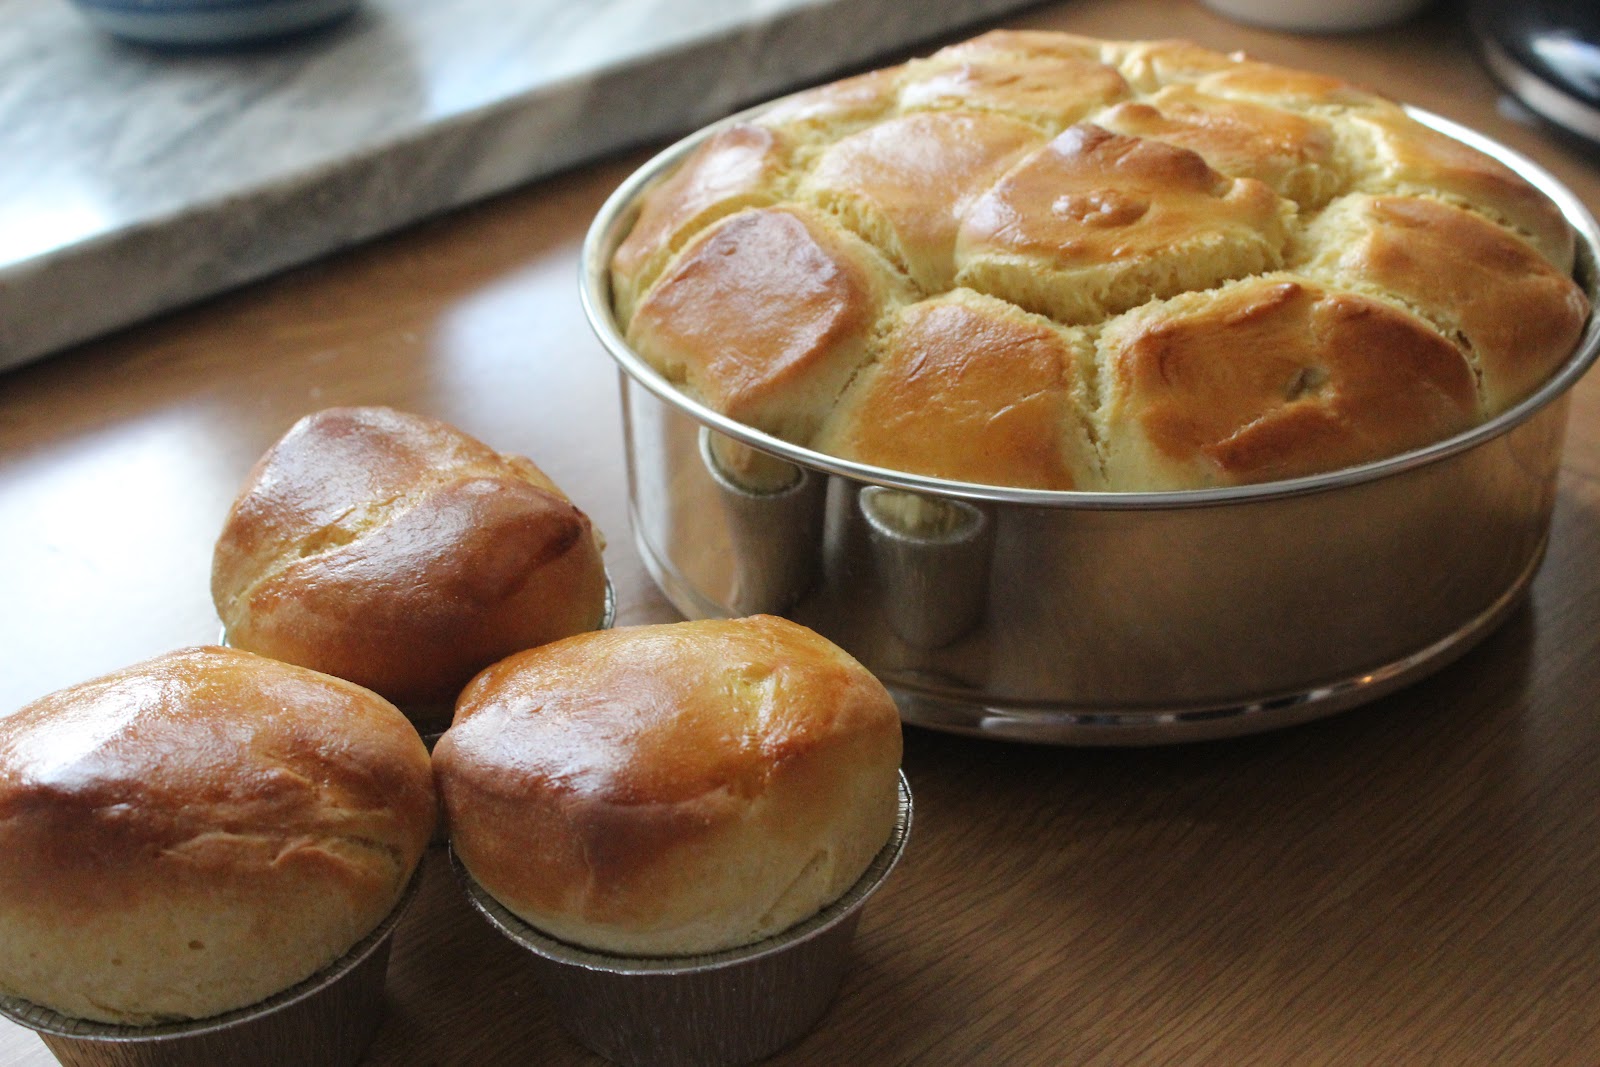
Brioche Danubio

The original recipe called for a 30-45 minute rise for the sponge, a 2-hour first rise for the dough, an overnight (at least 4-6 hours) second rise after the dough was deflated from the first rise, and a final two hour rise after the nanterre (the bumpy loaf shape) was formed. And as much as I love baking bread, it can be hard to manage the timing of all of these rises. I found that the dough worked really well if, after the overnight rise, the nanterre was shaped and the loaf pan refrigerated for the day. 


My game plan: 
Evening: Make dough, first rise, place in the fridge overnight (needs about 3 1/2 hours, with 30 minutes of that active preparation).
Next morning: Divide dough into segments, place in loaf pan, refrigerate, go to work.
Following evening: Come home from work, take dough out, give it a final rise, and bake.


Ingredients
Sponge:
1/3 cup whole warm milk
2 1/4 teaspoons active dry yeast
1 large egg
2 cups flour 
Dough:
1/3 cup sugar
1 teaspoon kosher salt
4 large eggs, lightly beaten
1 1/2 cups unbleached all-purpose flour
1 1/2 sticks butter (see note
Baking:
1 large egg beaten with one tablespoon cold water
Prepared loaf pans with dough

Note: Before starting this step, take 1 1/2 sticks of unsalted butter and leave it out so it can come to room temperature. 

Warm the milk to roughly 100-110 degrees Fahrenheit and it transfer to the bowl of a stand mixer. I find that active dry yeast works best around 95-100 degrees, so I would heat the milk to about 105 degrees, because it will cool once poured into the bowl. Add the yeast, egg, and 1 cup of flour to the bowl and mix with a spatula until combined. Add the other cup of flour, covering the mixture completely.  Allow to sit uncovered for 30-45 minutes, after which there will be cracks all over the flour on top. Place bowl in stand mixer, fit with dough hook, and proceed to completing the dough.
For dough: Add sugar, eggs, salt, and 1 cup of flour to the sponge, then mix on medium-low speed until combined. Bring the speed up to medium, then add the last 1/2 cup of flour. At this point, set a timer for 15 minutes and knead the dough on medium speed the entire time. If your mixer becomes too hot, stop to let it cool down. As the mixing continues, the dough should become more elastic and start slapping the sides of the bowl. If it doesn’t after 5-7 minutes, the dough is too wet. Add more flour by the tablespoon to bring the dough together. Scrape down the sides of the bowl if needed.  While you wait, take the butter and mash it so it becomes more pliable. The butter should not be oily, but smooth and cool. I like to put the butter on a plate and use an offset spatula to mash it.
After the 15 minutes are up, turn the mixer to medium-low and add butter two tablespoons at a time. The dough will become, for lack of a better term, a wet mess. Do not panic and keep mixing. After all of the butter has been added, turn the mixer to medium-high and mix until the dough starts to come together. Bring it down to medium and keep mixing until the slapping sound is heard again, with the dough back to its original elasticity. Add up to 1 teaspoon of flour if the butter is incorporated and the dough is still too wet. 
Butter a large bowl and place the dough in it. Cover tightly with plastic wrap and let the dough rise until double in size, roughly 2 to 2 1/2 hours. 
I like to use these tubs from Rubbermaid, which have airtight lids. Very useful for dough rises. 
Once the dough has doubled in size, deflate it by gently lifting every edge gently and letting it fall. Cover the bowl again, place in the refrigerator and let rise overnight. 
After the second rise is complete (the next morning), deflate it again, then turn to a lightly floured board. Give it a couple of kneading turns to smooth out the dough and round it into a disk. Cut the disk in half, then each piece in half three more times to produce sixteen equal pieces. 
Butter two loaf pans measuring approximately 10 x 5 x 3 inches and place eight rounds of dough in each one. The dough should be evenly spaced and will not necessarily touch each other. Cover the pans with plastic wrap and place in the refrigerator (see alternative to placing in the refrigerator). When close to baking time, take out of the refrigerator, allow to sit at room temperature for 1 hour, then bake. 
Alternative: If not placing in the refrigerator, cover with plastic wrap and allow to rise for two hours, then bake. 

Preheat oven 180°. Brush the tops of the loaves (the rounds of dough should be touching, but it is ok if there are still small gaps) with the egg wash and be then place in the oven. Set a timer for 25 minutes. After 12 minutes, open the oven and give the tops another coat of egg wash. Bake for the remainder of time. Open the oven, pull a loaf out and being very careful, tap the top of the loaf with your hand. If it sounds hollow (like tapping an empty box), the loaf is done. I found these loaves do best when slightly under-baked, which leaves them perfectly moist. 
If not serving immediately, cool the loaves completely and wrap in plastic wrap.


Oreo Fritters

Ingredients:
1 cup of flour
2 teaspoons of baking powder
pinch of salt
1 egg
2/3 cup of milk
12 Oreos

Mix together flour, baking and salt. Add egg and, gradually, the milk, mixing well while you pour it. 
Preheat oil, and butter every Oreo into the dough and place into the warm oil. Fry until its brown.
Serve them hot =)

Tuesday, February 28, 2012

Irish Coffee

Pomeriggio pigro come tanti!
Malessere generale e voglio di sperimentare :) potrà essere questo il mio toccasana?


Ingredienti:
1 tazzina di caffè lungo zuccherato
1 tazzina di Baileys Irish Coffee
1 cucchiaio colmo di panna montata
+ panna montata q.b.
+cacao amaro q.b.

Preparare il caffè, nel frattempo montare 1 bicchierino di panna.
Versare il caffè in un lungo bicchiere da servizio, aggiungere il Baileys amalgamato con la panna. 
Completare tutto con panna montata e spolverare con il cacao. Volendo potete aggiungere chicchi di caffè al cioccolato =)

Friday, February 24, 2012

Frittelle di mais e pancetta

Le ho preparate qualche settimana fa per una cena di compleanno. Non dovevo essere neanche io a farle, ma le cose improvvisate... sono le migliori *_* e così si è rivelato. Sono state un successo!!!


Ingredienti:
1 uovo
300 gr. mais in scatola
150 gr. farina (se occorre aggiungere di più)
500 ml. latte
200 gr. pancetta a dadini
100 gr. parmigiano grattugiato
olio per friggere q.b.
sale q.b.


Sbattere l'uovo e unire il latte, salare e unire lentamente la farina, per non far formare grumi.
Sgocciolare il mais e unirlo al composto di latte, aggiungere poi la pancetta e parmigiano.
Nel frattempo far riscaldare l'olio in una padella antiaderente e, una volta caldo, portateci all'interno il composto a medie cucchiaiate. Friggete a fiamma non troppo alta finchè saranno brune. Trasferirle su carta assorbente e servire calde =)

Banana & Kiwi Fritters

Maruya ("Banana & Kiwi Fritters") is one of my favourite merienda when I was in the Philippines. They sometimes place it in a bamboo stick and sometimes they shape it like a hand fans. I miss that moment especially after siesta that when we woke up, my mom cooks us merienda delicacies like this maruya during hot summer day.


Ingredients:
1/2 cup flour
3/4 tsp. baking powder
1/4 tsp. salt
1 egg
1 cup milk
2 ripe saba (banana plantain), peeled and sliced lengthwise
3 kiwis
2 cups vegetable oil
flour, for dredging · sugar


In a bowl, sift together flour, baking powder and salt. Add milk and egg, beat until smooth.
Heat oil in a frying pan (or a large saucepan) over medium heat.
In batches, roll banana and kiwi slices in flour and then dip in batter. Fry in hot oil until golden brown.
Drain on paper towels. Roll in sugar. Place in a serving dish and serve.